A Complete Guide
When it comes to creating a lasting impression—literally—few tools are as powerful and timeless as a custom embosser. Whether you’re branding official documents, elevating your business identity, or adding a personal touch to stationery, a high-quality embosser delivers a professional, tactile finish that ink simply can’t replicate.
At Fred Lake, embossers have been crafted with precision and expertise for decades, helping businesses and individuals create clean, raised impressions that stand out. But choosing the perfect embosser isn’t just about picking a design—it’s about understanding how function, materials, and customization all work together.
If you want sharp, consistent, and professional results, follow these three essential steps to selecting the perfect embosser.
Step 1: Identify Your Purpose and Paper Type
The first—and most important—step in choosing the right embosser is understanding how you plan to use it. Not all embossers are created equal, and selecting the wrong type can lead to weak impressions, paper damage, or inconsistent results.
Start With Your Use Case
Ask yourself:
- Are you embossing business documents, certificates, or legal paperwork?
- Are you creating personal stationery, monograms, or custom book plates?
- Will you emboss occasionally or in high volume?
For example:
- Businesses often need heavy-duty embossers for frequent use.
- Individuals may prefer compact or desk embossers for occasional projects.
-
High-output environments benefit from electric embossers that reduce strain and improve efficiency.
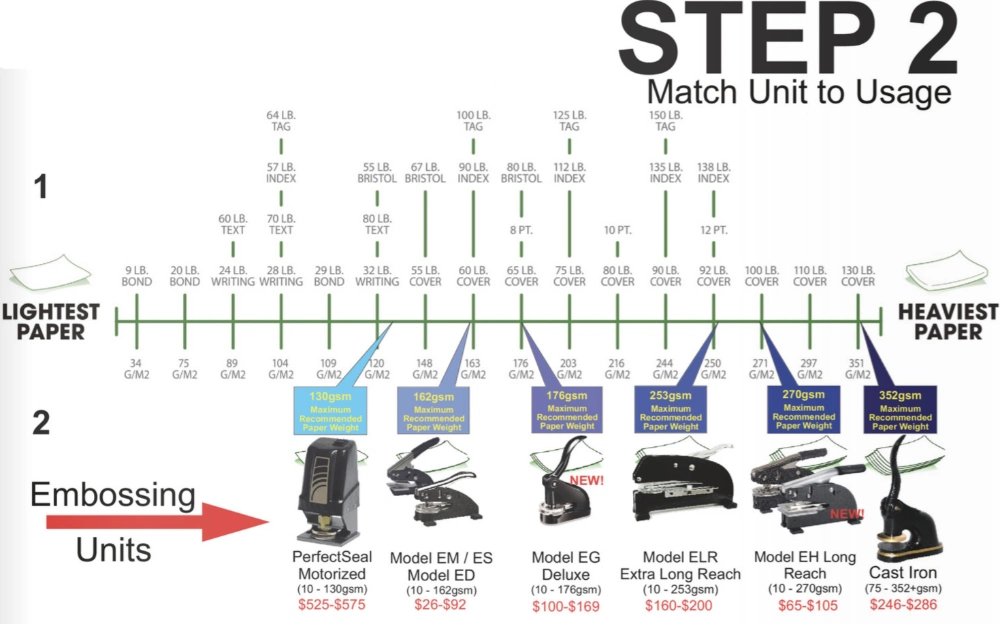
Fred Lake offers a full range—from personal line embossers to professional cast iron models and even motorized options—so you can match your tool to your workload.
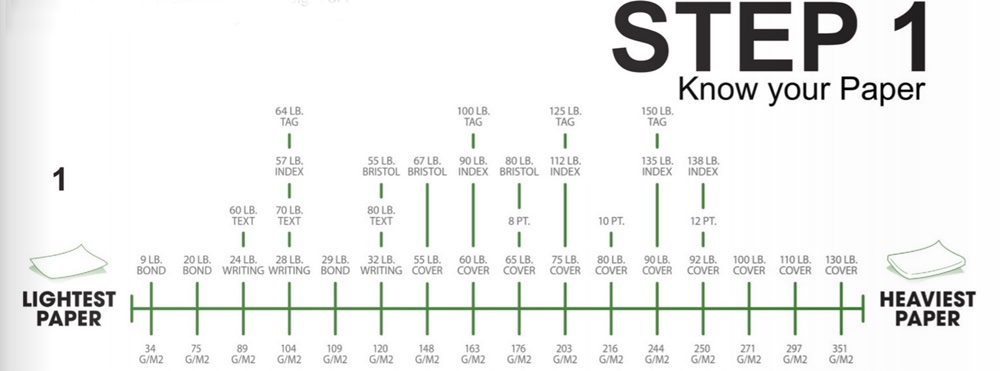
Match Your Embosser to Paper Weight
One of the most overlooked factors is paper type and weight—yet it has a huge impact on your final result.
Embossers work by pressing a male and female die together, reshaping the paper fibers to create a raised image. Because of this:
- Thicker paper produces a deeper, more defined impression
- Thinner paper may tear if the embosser is too aggressive
- Different paper fibers react differently to pressure
Fred Lake specifically designs embossers based on the paper you plan to use, ensuring the impression is “just deep enough” for optimal clarity without damage.
Pro Tip for Best Results
If you plan to use multiple paper types, always choose an embosser designed for the heaviest material you’ll use. This ensures versatility without sacrificing quality.
Step 2: Choose the Right Embosser Style, Orientation, and Reach
Once you understand your usage, the next step is selecting the right embosser style and configuration. This goes beyond appearance—it directly affects usability and precision.
Choose the Right Embosser Type
Fred Lake offers several core embosser styles:
-
Desk Embossers
Stable, durable, and ideal for consistent impressions in office environments
-
Pocket Embossers
Lightweight and portable, perfect for personal use or travel
-
Heavy-Duty Embossers
Built for thicker paper and high-frequency use
- Electric Embossers (PerfectSeal™)
Designed for efficiency with push-button operation
Each option serves a different need, so selecting the right type ensures both comfort and long-term performance.
Understand Embosser Orientation
Orientation refers to the direction from which your embosser presses into the paper—and it matters more than most people realize.
There are four standard orientations:
Choosing the wrong orientation can result in awkward placement or unusable impressions. For example:
- Bottom orientation is ideal for envelope flaps
- Right orientation works best for left-bound documents or books
Because the orientation is fixed when manufactured, it’s critical to choose correctly based on how and where your embossing will appear.
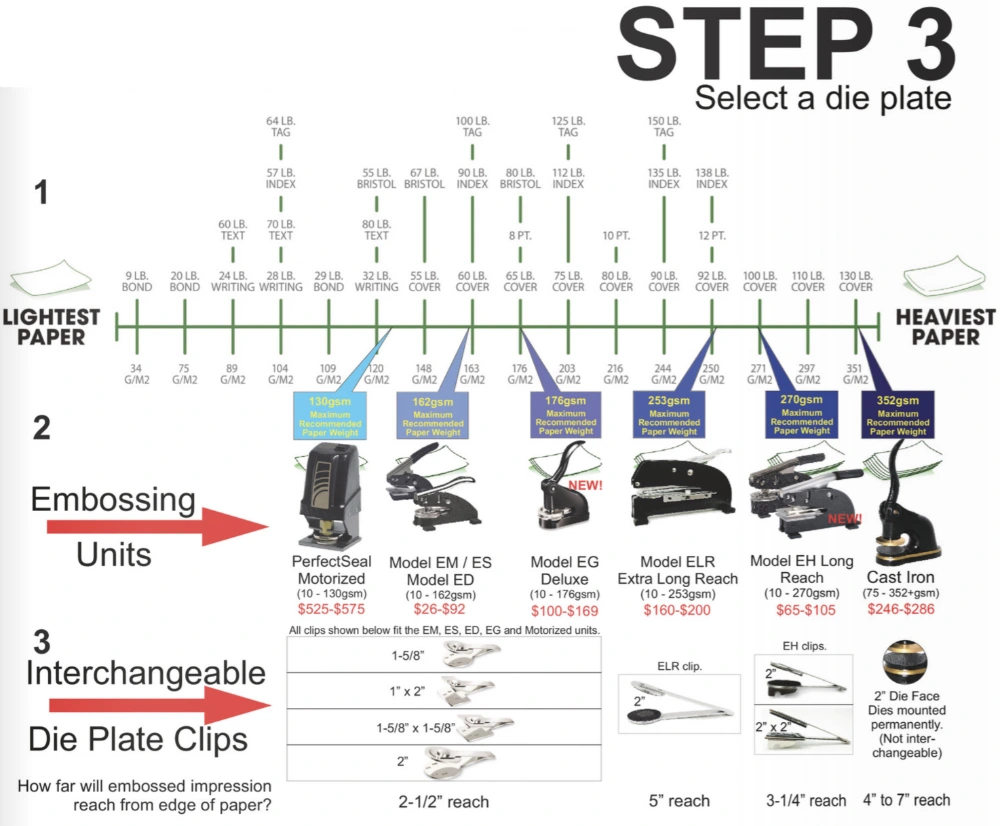
Consider Reach and Layout
Another key factor is reach, or how far into the paper the embosser can go.
- Standard embossers are great for edges and margins
- Long-reach embossers allow impressions further into the page
- Extra-long reach models are ideal for certificates or centered designs
Fred Lake offers multiple reach options, ensuring your embosser aligns perfectly with your layout needs.
Step 3: Design a Clean, Professional Embossing Seal
Now comes the creative part—designing your embosser. But great embossing isn’t about complexity; it’s about clarity.
Because embossing relies on pressure rather than ink, your design must be optimized for legibility and spacing.
Keep Your Design Simple
The most effective embossers follow one key rule: less is more.
- Use minimal wording
- Shorten phrases into key terms or initials
- Avoid overcrowding your layout
For example, instead of a full sentence, use:
- A monogram
- A company name
- A short phrase like “Approved”
Simple designs create cleaner impressions and improve readability.
Focus on Spacing and Balance
Embossers require clear separation between elements to maintain definition.
- Avoid overlapping text and graphics
- Ensure adequate spacing between lines and shapes
- Keep designs centered and balanced
Without proper spacing, impressions can become blurred or illegible.
Choose the Right Font and Graphics
Not all fonts and images translate well into embossing.
Best practices include:
- Use bold, legible fonts (like sans-serif styles)
- Avoid overly decorative or cursive fonts
- Skip intricate graphics with fine details
Complex designs can lose clarity during embossing, especially when lines are too thin or close together.
Request a Proof Before Production
Before finalizing your embosser, always request a design proof. This allows you to preview your seal and make adjustments before manufacturing.
Fred Lake provides proofs to ensure your final product meets expectations—saving time, money, and frustration.
Why a High-Quality Embosser Matters
A well-designed embosser does more than just look good—it delivers real value:
- Professional branding for documents and correspondence
- Enhanced security, as embossed marks are difficult to replicate
- Long-lasting impressions that won’t smudge or fade
- Elevated presentation for certificates, awards, and stationery
Unlike printed marks, embossing creates a physical texture that signals authenticity, attention to detail, and quality.
Invest in the Right Embosser
Choosing the perfect embosser comes down to three key decisions:
- Match the embosser to your use and paper type
- Select the correct style, orientation, and reach
- Design a clean, simple, and legible seal
When these elements come together, the result is a tool that delivers consistent, professional impressions every time.
With decades of expertise and a full range of customizable options, Fred Lake makes it easy to create an embosser tailored to your exact needs—whether for business, personal use, or high-volume applications.
If you’re ready to elevate your documents and make a lasting impression, investing in the right embosser is the first step.